


Yoga offers a variety of benefits to anyone who gets on the mat. Whether you're a runner, cyclist, or lifter, yoga for athletes can help you improve your skills. recovery, liquidityfocus and proprioception.
one study of college athletes who practiced yoga for 10 weeks significantly improved their flexibility and balance compared to those who did not practice yoga. Research from 2020 They pointed out the potential benefits of using yoga as part of a football program to help lower the risk of certain injuries.
at Gentle and Spiritual Practices more a physically difficult personThere are over a dozen different items. types of yoga This can all be tailored to suit your needs. This is why yoga for athletes has become mainstream. All of these benefits will help you on the field or on the track, and can also help you build a resilient, injury-free body.
“Training your body for the unexpected can help you better manage uncontrollable accidents—those unexpected rocks when running toward home base,” says Laurice D. Nemetz, E-RYT 500 and associate professor. that Pace University's College of Health Professions in Pleasantville; In New York City.
Want to create your own yoga routine? Start with this pose.
- Start on all fours with your knees directly below your hips and your wrists a few inches in front of your shoulders. Point your fingertips forward and spread your fingers wide.
- As you exhale, tuck your toes, press into your hands, straighten your arms and legs, and lift your hips toward the ceiling. Place your hands shoulder-width apart and your feet hip-width apart.
- Rotate your arms outward to avoid straining your shoulders. Keep your elbows straight and use your biceps to keep them from falling out. Look back on your toes and keep your ears in line with your arms.
- Hold the position for 1 minute.
- Inhale your right leg high in downward facing dog. Exhale and place your right foot between your hands, attempting a low lunge.
- Move your right hand on the inside of your right foot. Place the toes of your right foot on the edge of your yoga mat. Align your right knee over your ankle. Plant your right foot on the mat.
- For a deeper stretch, keep your shoulders stacked on top of your wrists or lowered to your elbows (keeping your forearms parallel).
- Keep your back legs long and straight. Squeeze your glutes to keep your hips square. Push the backs of your knees toward the ceiling to engage your leg muscles. Lower to your back knee for a passive stretch.
- Lower your gaze toward the mat.
- Take a moment to breathe. Move through downward facing dog and repeat on the other side.
- Start in downward-facing dog pose with your hands shoulder-width apart and your feet a few inches apart.
- Lift your right foot off the floor, bend your knee, push it toward your chest, and lift it between your hands.
- Lower your left knee onto the mat, loosen your toes and allow the top of your back foot to touch the floor.
- Bend your front leg, lift your chest, and raise your arms up to the ceiling.
- Push your hips forward and keep your front knee pointed straight over your ankle. Square your hips so that both hip bones point forward. Use your core.
- Extend your arms high and place your palms facing each other. Keep your shoulders pressed down.
- Stay here for a minute and then change direction.
- Start in a high plank position. Arms are straight, shoulders stacked over wrists, and body in a straight line from head to heels.
- Brace your core, bend your arms, and slowly lower to the floor. Keep your elbows close to your body. (Kneel if necessary.) Once you reach the floor, release your toes so that the tops of your feet are on the mat.
- Place your hands on the mat under your shoulders, pressing your palms down and using your arms and back muscles to lift your chest off the floor. Keep your elbows close to your sides and slightly bent. Straighten your legs and press your toes into the mat.
- Open your chest and press your shoulder blades away from your ears. Do not bend your back. You should feel your waist lengthening. Keep your legs straight and press them into the floor.
- Hold for at least 5 breaths.
Inhalation: cow pose
- Start on all fours. Place your knees under your hips and your hands under your shoulders. Keep your back straight, your gaze toward the floor, and your neck long.
- As you inhale, lift your tailbone and chest toward the ceiling and lower your stomach toward the mat.
- Keep your shoulders away from your ears, your shoulder blades spread wide across your back, and your head in line with your torso.
- Exhale into cat pose.
Exhale: Cat Pose
- Start in cow pose.
- As you exhale, round your back, tuck your tailbone, and roll your chin toward your chest.
- Keep your shoulders and knees in place.
- Inhale into cow pose.
- Repeat this flow up to 10 times, or longer if desired.
- Start by lying on your back on the mat. Bend your legs so your feet are flat on the mat.
- Bring your knees to your chest, reach behind your thighs, and slowly spread your knees as you lift the soles of your feet toward the ceiling.
- Reach your arm between your legs and grab the tip of your pinky finger. Press your feet as if you were standing on the ceiling.
- Lower your head, shoulders, and back of your arms toward the mat while pulling your knees toward your body.
- Stay for up to one minute, then slowly bring your knees together and lower your feet back to the mat.
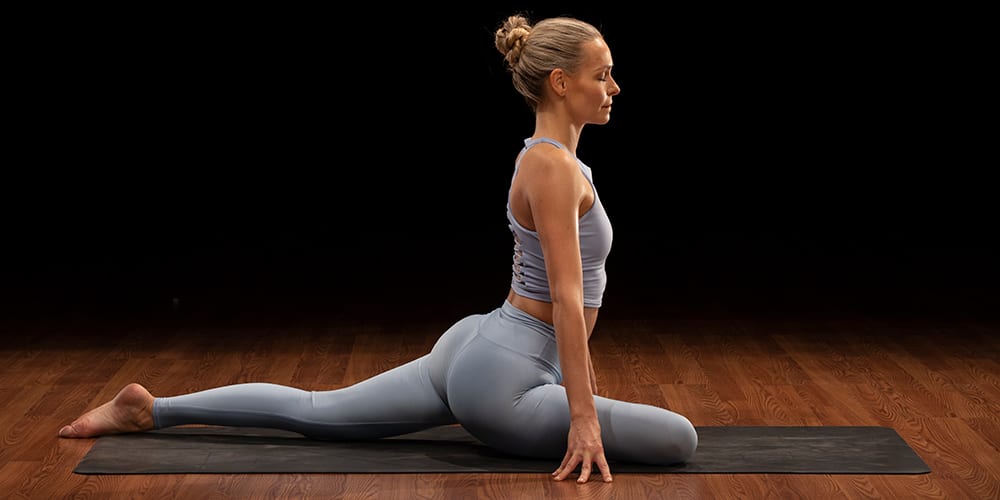
- Start on all fours with your hands shoulder-width apart and your knees hip-width apart.
- Bring your right knee forward and place it on the floor behind your right wrist.
- Slide your right ankle toward your left wrist so your right shin crosses the mat at a comfortable angle.
- Straighten your left leg behind you and slowly lower your buttocks to the floor. Keep the top of your left foot flat on the floor.
- Keep your hips level and distribute your weight evenly between both sides (being careful not to sink into your right hip).
- From here, you can either stay upright (keep your hands on the floor in front of you, chest up, core contracted), or fold forward and slowly extend your hands out in front of you and lower your chest to the floor. floor.
- Maintain the posture and breathe 5 to 10 times, then change direction and repeat.
- To come out of the pose, tuck your left toes down, press them with your hands, and then slowly return your right foot to the starting position.
Source link